[Android/Kotlin] RecyclerView Move to Top - 최상단 이동
Notepad96
·2022. 8. 26. 15:33
1. 요약

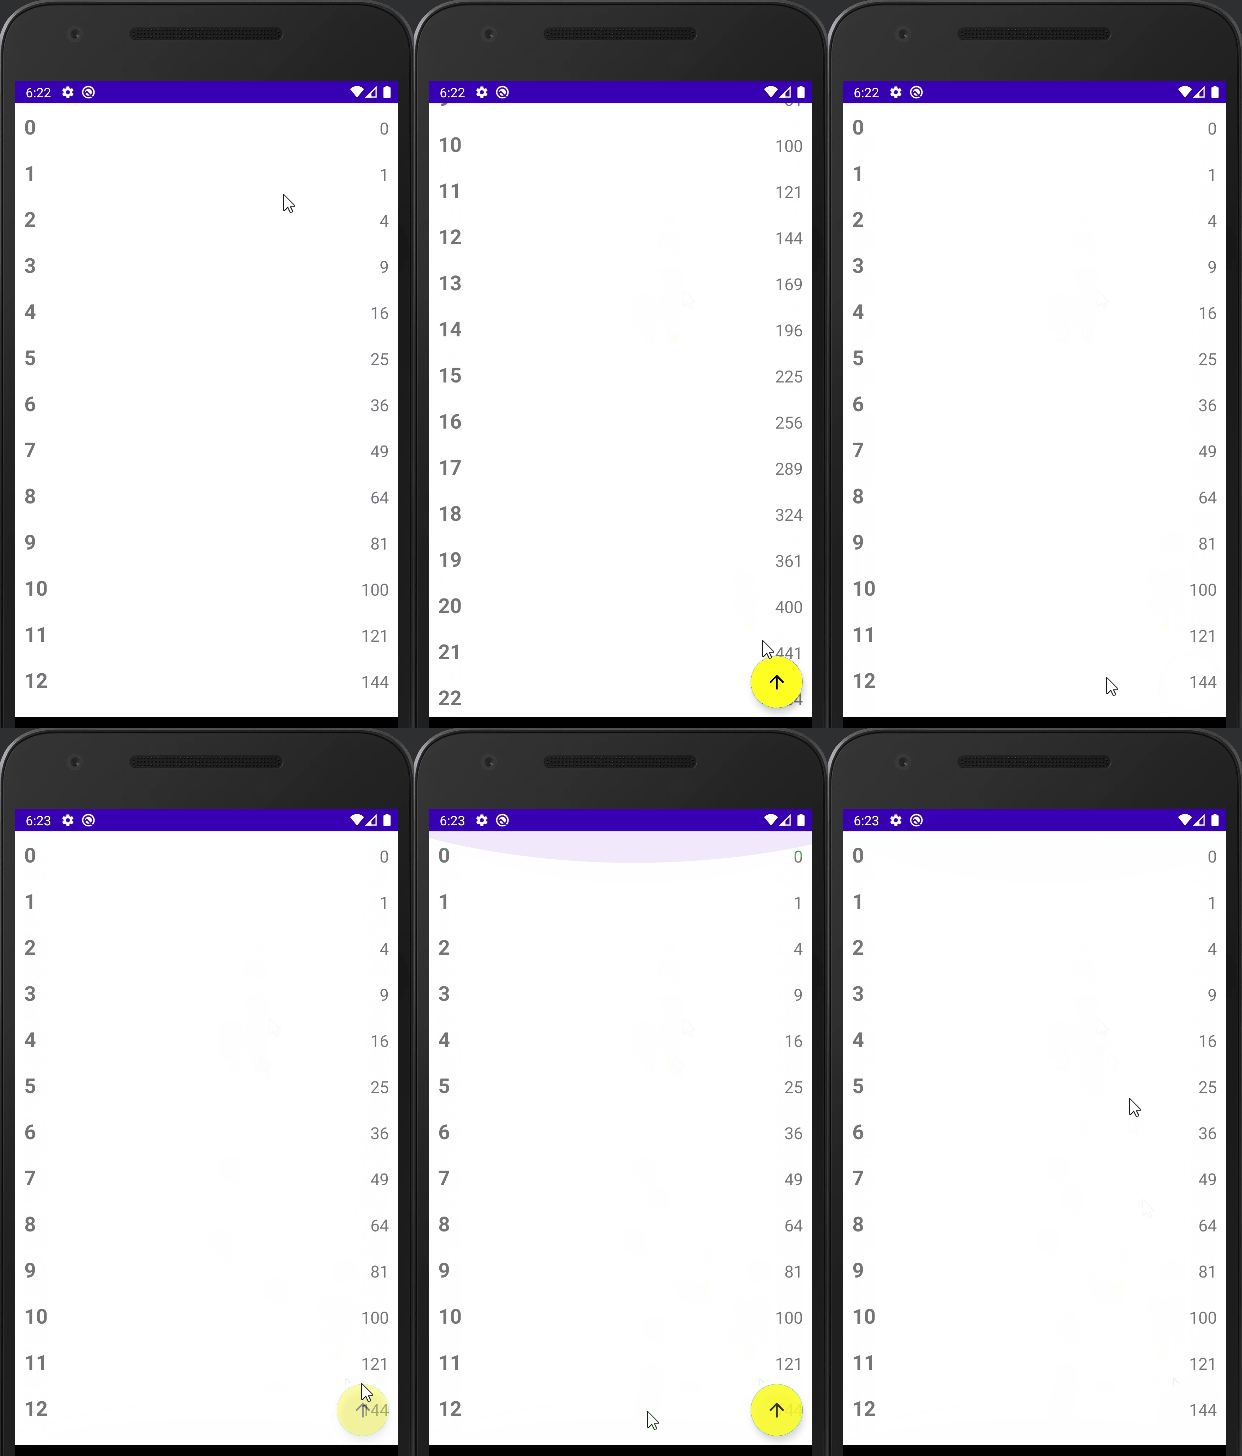
이번 글에서는 RecyclerView 리스트의 최상단으로 이동하도록 동작하는 버튼을 만드는 방법에 관하여 기술한다.
버튼은 애니메이션을 적용하여서 최상단이 아닐 경우 점점 나타나도록 만들었으며, 최상단이 될 경우 점점 사라져 보이지 않도록 만들었다.
2. 레이아웃
2-1. activity_main.xml
메인 레이아웃으로서 RecyclerView 1개와 FloatingButton 1개로 구성하였다.
RelativeLayout을 사용하여서 FloatingButton을 오른쪽 아래의 위치하도록 배치하였다.
Floating Button은 리스트가 최상단이 아닐 경우만 보여주기 위하여 보이지 않는 상태이다.

<?xml version="1.0" encoding="utf-8"?>
<RelativeLayout xmlns:android="http://schemas.android.com/apk/res/android"
    xmlns:app="http://schemas.android.com/apk/res-auto"
    xmlns:tools="http://schemas.android.com/tools"
    android:layout_width="match_parent"
    android:layout_height="match_parent"
    tools:context=".MainActivity">

    <androidx.recyclerview.widget.RecyclerView
        android:id="@+id/recyclerView01"
        android:layout_width="match_parent"
        android:layout_height="match_parent" />

    <com.google.android.material.floatingactionbutton.FloatingActionButton
        android:id="@+id/floatBtn01"
        android:layout_width="wrap_content"
        android:layout_height="wrap_content"
        android:layout_alignParentEnd="true"
        android:layout_alignParentBottom="true"
        android:layout_marginBottom="10dp"
        android:layout_marginRight="10dp"
        android:backgroundTint="#ff2"
        android:visibility="gone"
        android:src="@drawable/ic_baseline_arrow_upward_24"
        />

</RelativeLayout>
2-2. item_list.xml
리스트 항목을 나타내는 레이아웃으로 TextView 2개로 구성하였다.
<?xml version="1.0" encoding="utf-8"?>
<LinearLayout xmlns:android="http://schemas.android.com/apk/res/android"
    android:layout_width="match_parent"
    android:layout_height="wrap_content"
    android:padding="10dp"
    android:orientation="horizontal">

    <TextView
        android:id="@+id/mainText"
        android:layout_width="wrap_content"
        android:layout_height="wrap_content"
        android:layout_weight="1"
        android:textSize="22sp"
        android:textStyle="bold"
        android:text="Main"
        />

    <TextView
        android:id="@+id/subText"
        android:layout_width="wrap_content"
        android:layout_height="wrap_content"
        android:layout_weight="1"
        android:gravity="right"
        android:textSize="18sp"
        android:text="Sub"
        />

</LinearLayout>
3. 코드 및 설명
3-1. ListAdapter.kt
각 항목의 보여줄 내용은 각 항목의 Position값을 이용하여서 간단하게 나타내었으며 RecyclerView에 관한 자세한 설명은 생략하겠다. 모르겠다면 본 블로그에 RecyclerView 관련 글이 많이 있기 때문에 참조하면 될 것 같다.
package com.notepad96.recyclerviewmovetop

import android.view.LayoutInflater
import android.view.ViewGroup
import androidx.recyclerview.widget.RecyclerView
import com.notepad96.recyclerviewmovetop.databinding.ItemListBinding

class ListAdapter: RecyclerView.Adapter<ListAdapter.MyView>() {
    inner class MyView(private val binding: ItemListBinding): RecyclerView.ViewHolder(binding.root) {
        fun bind(pos: Int) {
            binding.mainText.text = "$pos"
            binding.subText.text = "${pos * pos}"
        }
    }

    override fun onCreateViewHolder(parent: ViewGroup, viewType: Int): MyView {
        val view = ItemListBinding.inflate(LayoutInflater.from(parent.context), parent, false)
        return MyView(view)
    }

    override fun onBindViewHolder(holder: MyView, position: Int) {
        holder.bind(position)
    }

    override fun getItemCount(): Int {
        return 40
    }
}
3-2. MainActivity.kt
리스트 최상단에 위치하고 있는 상태이면 버튼이 보이지 않으며, 최상단이 아닐 경우 버튼이 보이게 되어 클릭하면 최상단으로 이동하는 버튼 이벤트를 발동시킬 수 있는 구조이다.
이를 위하여 우선 버튼이 나타나고 사라지는 것을 위하여 AlphaAnimation으로 애니메이션 객체 fadeIn, fadeOut를 생성해주며 현재 최상단인지 판별하기 위한 isTop 변수를 정의한다.
애니메이션 정의와 관련된 내용은 아래 글을 참조하면 된다.
[Android/Kotlin] Animation Programmatically - alpha, translate, scale
1. 요약 이번 글에서는 Animation을 코드로(programmatically) 혹은 Animation Resource File로 정의한 후 적용하는 방법에 관하여 기술한다. 구현한 Animation으로는 다음과 같이 3가지가 있다. alpha : 투명도..
notepad96.tistory.com
RecyclerView의 Scroll 상태 변화에 따라 변화를 주어야 하므로 이를 감지하기 위하여 RecyclerView.OnScrollListener 리스너를 재정의 해준다.
package com.notepad96.recyclerviewmovetop

import android.os.Bundle
import android.util.Log
import android.view.View
import android.view.animation.AlphaAnimation
import androidx.appcompat.app.AppCompatActivity
import androidx.recyclerview.widget.LinearLayoutManager
import androidx.recyclerview.widget.RecyclerView
import com.notepad96.recyclerviewmovetop.databinding.ActivityMainBinding

class MainActivity : AppCompatActivity() {
    private val binding by lazy { ActivityMainBinding.inflate(layoutInflater) }
    override fun onCreate(savedInstanceState: Bundle?) {
        super.onCreate(savedInstanceState)
        setContentView(binding.root)

        binding.recyclerView01.apply {
            adapter = ListAdapter()
            layoutManager = LinearLayoutManager(context)
            setHasFixedSize(true)
        }

        val fadeIn = AlphaAnimation(0f, 1f).apply { duration = 500 }
        val fadeOut = AlphaAnimation(1f, 0f).apply { duration = 500 }
        var isTop = true

        binding.recyclerView01.addOnScrollListener(object: RecyclerView.OnScrollListener() {
            override fun onScrollStateChanged(recyclerView: RecyclerView, newState: Int) {
                super.onScrollStateChanged(recyclerView, newState)
                if (!binding.recyclerView01.canScrollVertically(-1)
                    && newState == RecyclerView.SCROLL_STATE_IDLE) {
                        binding.floatBtn01.startAnimation(fadeOut)
                        binding.floatBtn01.visibility = View.GONE
                        isTop = true
                        Log.d("myLog", "Top")
                } else {
                    if(isTop) {
                        binding.floatBtn01.visibility = View.VISIBLE
                        binding.floatBtn01.startAnimation(fadeIn)
                        isTop = false
                        Log.d("myLog", "Not Top")
                    }
                }
            }
        })

        binding.floatBtn01.setOnClickListener {
            binding.recyclerView01.smoothScrollToPosition(0)
        }
    }
}
● 최상단 판별
다음으로 현재 리스트의 최상단을 검사하기 위하여 다음과 같이 if문을 사용해주고 있다.
if (!binding.recyclerView01.canScrollVertically(-1)
&& newState == RecyclerView.SCROLL_STATE_IDLE)- canScrollVertically(-1) : 최상단일 경우 false 값 return
- canScrollVertically(1) : 최하단일 경우 false 값 return
따라서 !canScrollVertically(-1) 이면 최상단일 경우 true값을 얻게 된다. 그다음 RecyclerView.SCROLL_STATE_IDLE은 현재 스크롤되지 않는 상태임을 나타내며, 이를 조건에 추가해주는 이유는 스크롤에 인한 중복 발생을 방지하기 위해서이다.
상태 값들의 관련해서는 아래 Docs를 통하여 확인해 볼 수 있다.
RecyclerView | Android Developers
androidx.car.app.managers
developer.android.com
이제 마지막으로 조건에 따라 최상단임을 판별되었으니 앞서 선언한 fadeIn, fadeOut을 사용하여서 애니메이션을 보여주면 버튼이 사라지고 나타나게 할 수 있다.
● 최상단 이동
최상단으로 이동하는 동작은 FloatingButton 클릭 이벤트의 구현하였으며 recyclerview의 smoothScrollToPosition(0)을 통하여 리스트의 0번째 항목으로 이동하도록 한다.
4. 전체 파일
GitHub - Notepad96/BlogExample02
Contribute to Notepad96/BlogExample02 development by creating an account on GitHub.
github.com
'Android' 카테고리의 다른 글
| [Android/Kotlin] CoordinatorLayout - 축소되는 앱 바 (1) | 2022.08.28 |
|---|---|
| [Android/Kotlin] RecyclerView Divider - 구분선 만들기 (0) | 2022.08.27 |
| [Android/Kotlin] Animation Programmatically - alpha, translate, scale (0) | 2022.08.25 |
| [Android/Kotlin] RecyclerView Last Item Check - 리스트 마지막 항목 (0) | 2022.08.24 |
| [Android/Kotlin] DataBinding 데이터 바인딩 (0) | 2022.08.21 |
 Notepad


