Android Kotlin Chip Button
Notepad96
·2022. 1. 31. 23:45

1. 결 과

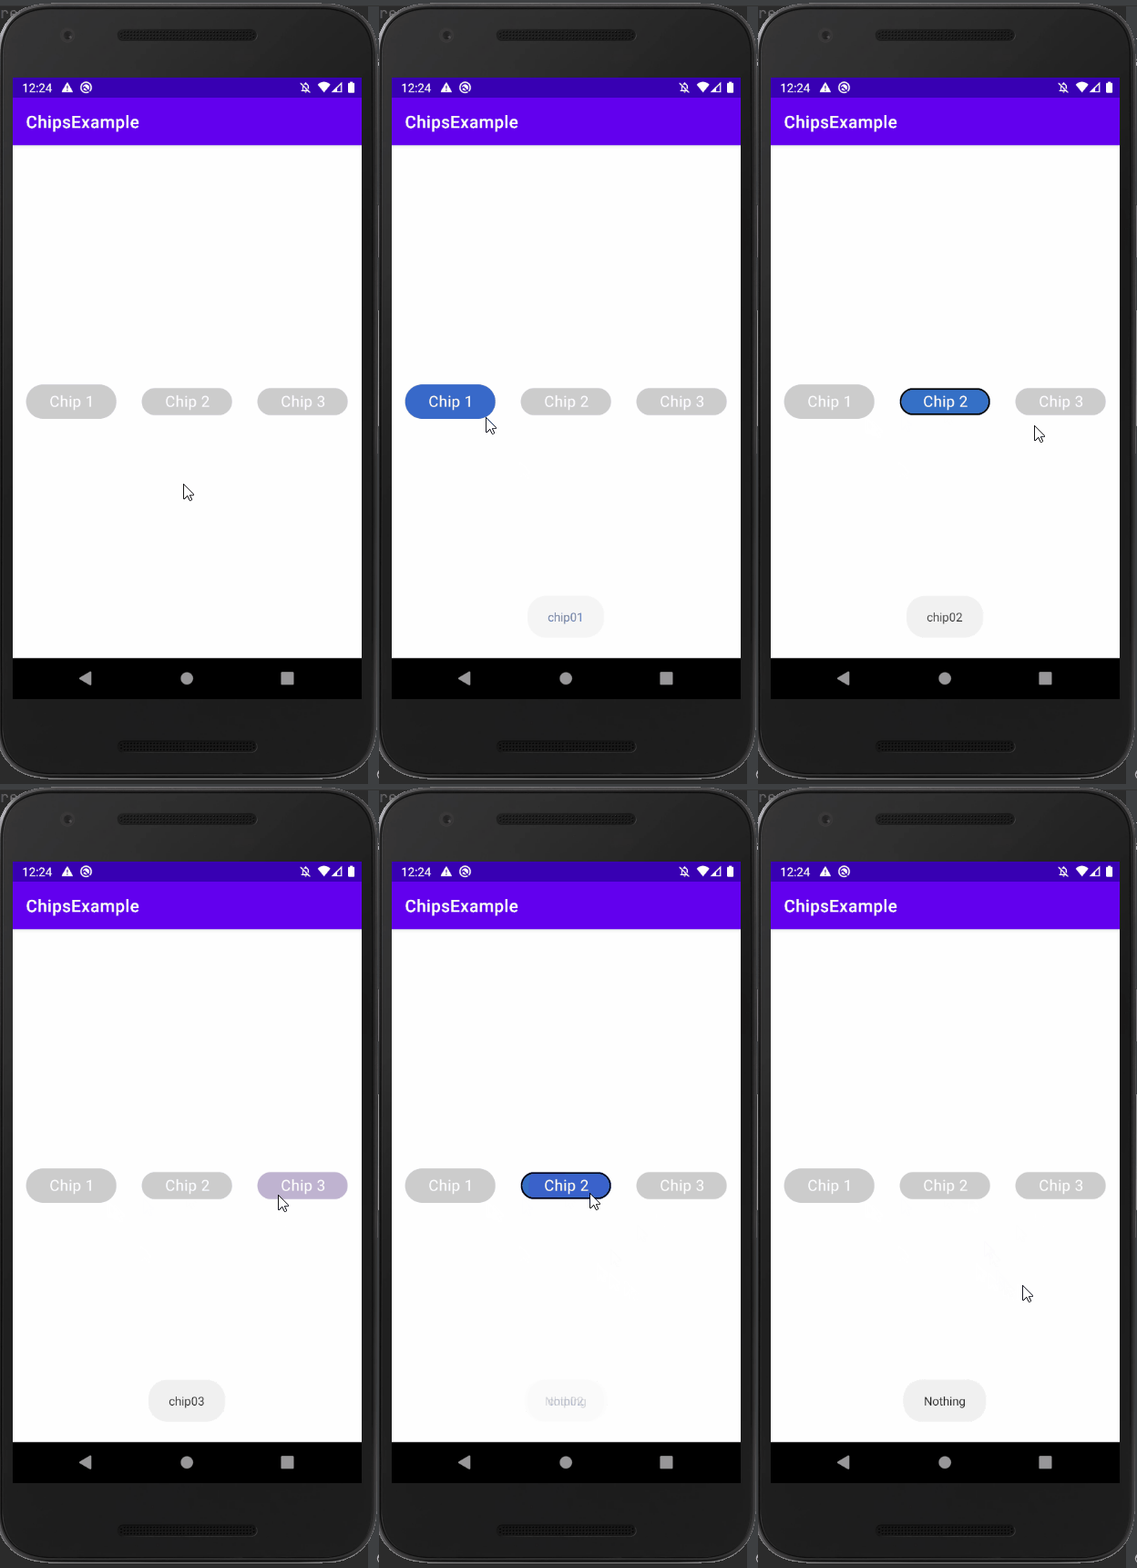
# Chip Button은 아래 이미지서 나타난 것처럼 스타일에는 4개의 타입이 있으며 (1.input / 2.choice / 3.filter / 4.action )이 중 어떤 스타일을 사용하며 커스텀을함에 따라서 다양하게 활용할 수 있다.

# 이 글에서는 Choice 스타일을 사용하는 chip 3개를 chipgroup으로 묶어 마치 radiobutton 처럼 하나만을 선택할 수 있도록 만드는 방법을 기술한다.
또한 추가적으로 chip의 padding, 선택 여부의 따른 style 변경 방법을 기술한다.
2. activity_main.xml
<?xml version="1.0" encoding="utf-8"?>
<LinearLayout xmlns:android="http://schemas.android.com/apk/res/android"
    xmlns:app="http://schemas.android.com/apk/res-auto"
    xmlns:tools="http://schemas.android.com/tools"
    android:layout_width="match_parent"
    android:layout_height="match_parent"
    android:gravity="center"
    tools:context=".MainActivity">

        <com.google.android.material.chip.ChipGroup
            android:id="@+id/chipGroup"
            app:chipSpacingHorizontal="30dp"
            app:singleSelection="true"
            android:layout_width="wrap_content"
            android:layout_height="wrap_content" >

            <com.google.android.material.chip.Chip
                style="@style/Widget.MaterialComponents.Chip.Choice"
                android:id="@+id/chip01"
                android:layout_width="wrap_content"
                android:layout_height="wrap_content"
                app:chipMinHeight="40dp"
                app:chipStartPadding="20dp"
                app:chipEndPadding="20dp"
                app:chipBackgroundColor="@color/chip_check"
                android:textSize="18sp"
                android:textColor="@color/white"
                android:text="Chip 1"/>

            <com.google.android.material.chip.Chip
                style="@style/Widget.MaterialComponents.Chip.Choice"
                android:id="@+id/chip02"
                android:layout_width="wrap_content"
                android:layout_height="wrap_content"
                app:chipStartPadding="20dp"
                app:chipEndPadding="20dp"
                app:chipStrokeColor="@color/chip_border_check"
                app:chipStrokeWidth="2dp"
                app:chipBackgroundColor="@color/chip_check"
                android:textSize="18sp"
                android:textColor="@color/white"
                android:text="Chip 2"/>

            <com.google.android.material.chip.Chip
                style="@style/Widget.MaterialComponents.Chip.Choice"
                android:id="@+id/chip03"
                android:layout_width="wrap_content"
                android:layout_height="wrap_content"
                app:chipStartPadding="20dp"
                app:chipEndPadding="20dp"
                app:chipBackgroundColor="@color/chip_check"
                android:textSize="18sp"
                android:textColor="@color/white"
                android:text="Chip 3"/>

        </com.google.android.material.chip.ChipGroup>

</LinearLayout>
# 레이아웃은 ChipGroup 속에 Chip 버튼 3개가 포함된 구성이다.
# ChipGroup
└> chipSpacingHorizontal 속성: chip 버튼 간에 Horizontal 거리를 설정한다.
└> singleSelection 속성: True 값을 줌으로써 Group 내에 포함된 chip 중 하나만을 선택이 가능하도록 만든다.
# Chip
└> 스타일은 Choice로 설정
└> chipMinHeight 속성: chip 버튼의 높이를 설정할 수 있다.
└> chipStartPadding&chipEndPadding 속성: 각각 chip 버튼의 좌우 패딩을 값을 설정한다.
└> chipStrokeWidth&chipStrokeColor 속성: 각각 테두리의 굵기와 색상을 설정한다.
└> chipBackgroundColor 속성: chip 버튼의 백그라운드 색을 설정한다.
여기서 BackgroundColor나 StrokeColor를 보면 @color/~ 처럼 리소스 파일을 지정해주고 있다.
그 리소스 파일은 res/color 디렉터리의 선언되며 다음과 같이 구성된다.
<?xml version="1.0" encoding="utf-8"?>
<selector xmlns:android="http://schemas.android.com/apk/res/android">
    <item android:color="@color/black"  android:state_checked="true" />
    <item android:color="#00FFFFFF"  />
</selector>
보면 android:state_checked="true"일 경우 Color로 black을 주며 그렇지 않을 경우 투명색을 지정해준다.
따라서 이를 속성 값으로 주었을 경우 chip 버튼이 선택되었을 경우 checked="true" 경우로 색을 black으로 설정하며 그렇지 않을 경우 투명색으로 설정된다.
3. MainActivity.kt
package com.example.chipsexample

import androidx.appcompat.app.AppCompatActivity
import android.os.Bundle
import android.util.Log
import android.widget.Toast
import kotlinx.android.synthetic.main.activity_main.*

class MainActivity : AppCompatActivity() {
    override fun onCreate(savedInstanceState: Bundle?) {
        super.onCreate(savedInstanceState)
        setContentView(R.layout.activity_main)

        chipGroup.setOnCheckedChangeListener { group, checkedId ->
            Log.d("test", "Click: $checkedId")
            when(checkedId) {
                R.id.chip01 -> {
                    Toast.makeText(applicationContext, "chip01", Toast.LENGTH_SHORT).show()
                }
                R.id.chip02 -> {
                    Toast.makeText(applicationContext, "chip02", Toast.LENGTH_SHORT).show()
                }
                R.id.chip03 -> {
                    Toast.makeText(applicationContext, "chip03", Toast.LENGTH_SHORT).show()
                }
                else -> {
                    Toast.makeText(applicationContext, "Nothing", Toast.LENGTH_SHORT).show()
                }
            }
        }
    }
}
# chip 버튼을 클릭하였을 시 Toast 메시지를 보여줄 수 있도록 구성하였다.
# 아무것도 선택하지 않을 경우 else문이 실행된다.
4. 전체 코드 및 참고 자료
GitHub - Notepad96/BlogExample
Contribute to Notepad96/BlogExample development by creating an account on GitHub.
github.com
Material Design
Build beautiful, usable products faster. Material Design is an adaptable system—backed by open-source code—that helps teams build high quality digital experiences.
material.io
'Android' 카테고리의 다른 글
| Android Kotlin Font - 폰트 적용 (0) | 2022.02.02 |
|---|---|
| Android Kotlin Custom Calendar - 커스텀 달력 (0) | 2022.02.01 |
| Android Kotlin Calendar - 달력/시계 날짜 및 시간 지정하기 (0) | 2022.01.18 |
| Android Kotlin RecyclerView Parent View Style - 부모 뷰 오브젝트 스타일 변경 (0) | 2022.01.17 |
| Android Kotlin SnapHelper - 항목 단위로 스크롤 (0) | 2022.01.16 |
 Notepad


