Android Kotlin Custom Calendar - 커스텀 달력
Notepad96
·2022. 2. 1. 02:38

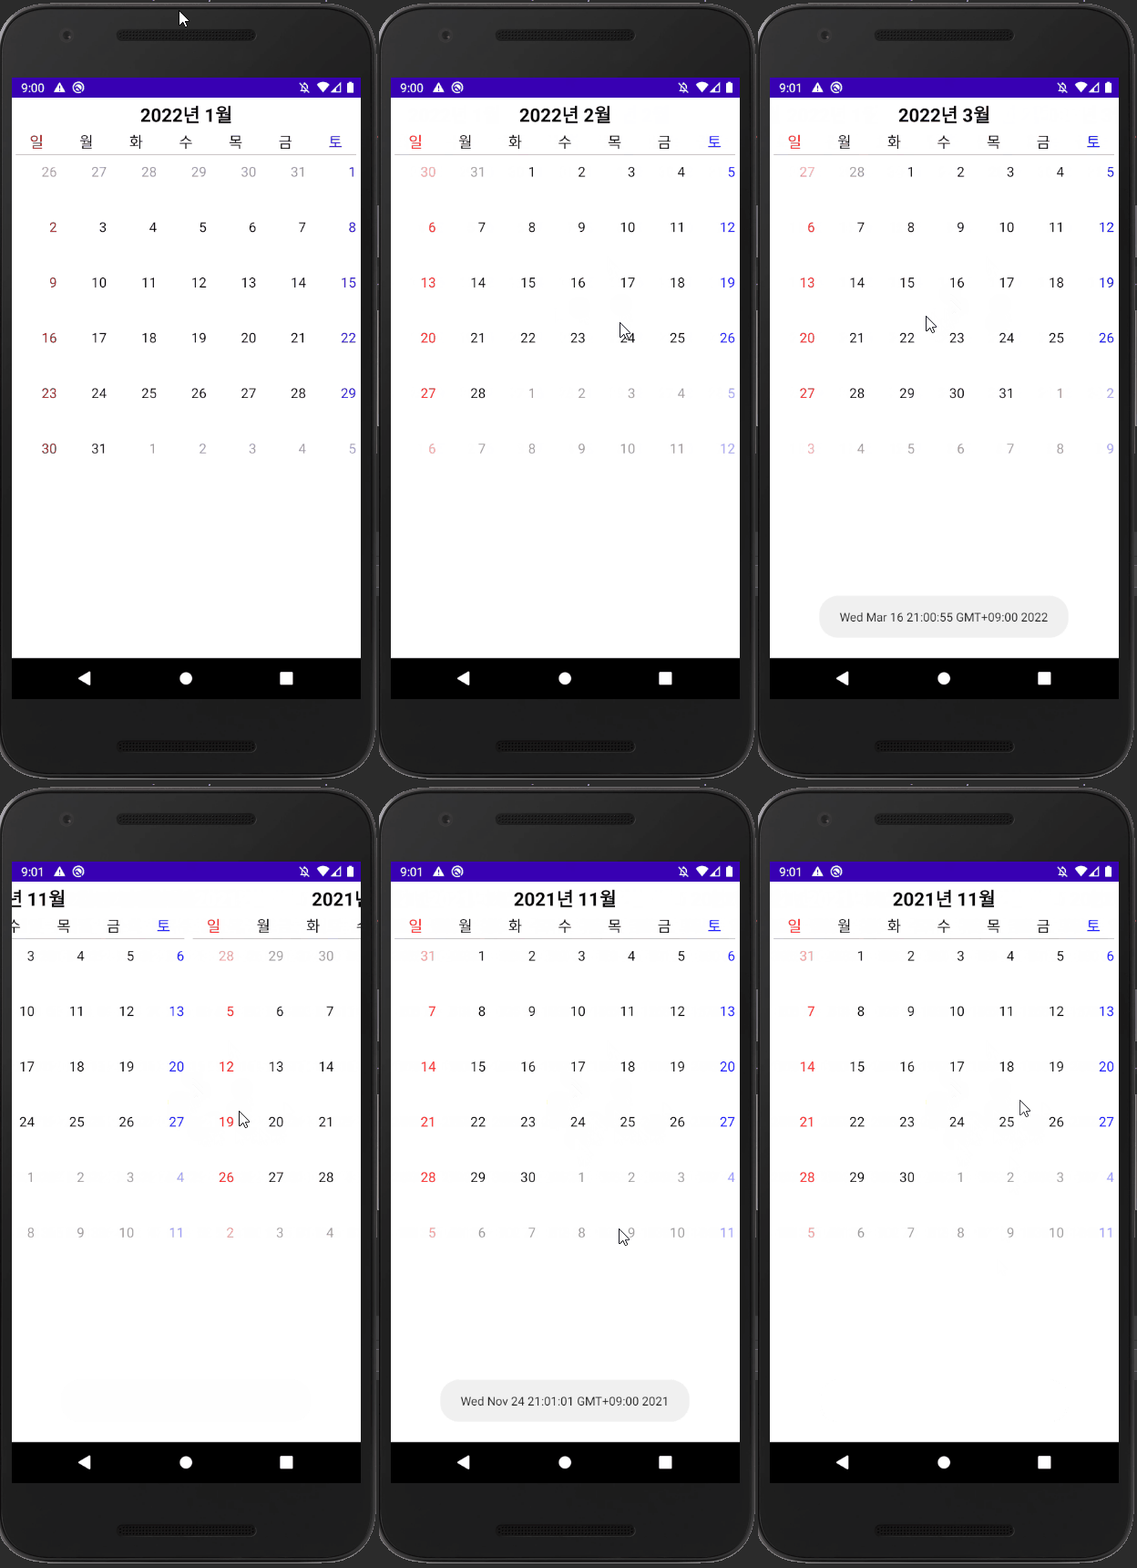
1. 결 과

# 이 글은 RecyclerView를 이중으로 사용하여 커스텀 달력을 만드는 방법을 기술한다.
우선 가로형 타입의 RecyclerView 사용하여 각 월을 나타내며 이 안에서 각 일수를 나타내기 위한 Grid 타입의 RecyclerView를 사용한다.
각 타입 대한 RecyclerView의 자세한 내용은 이전글을 참고하면 될 것 같다.
Android Kotlin RecyclerView - 리사이클러뷰(가로, 세로)
1. 결과 2. activity_main.xml (메인 레이아웃) <?xml version="1.0" encoding="utf-8"?> # 1번 째 리사이클러 뷰는 Vertical(세로) 방향의 리사이클러 뷰 # 2번 째 리사이클러 뷰는 Horizontal(가로) 방향의 리..
notepad96.tistory.com
Android Kotlin RecyclerView Grid - 리사이클러뷰(격자형, 표 형식)
1. 결과 2. Layout 2-1. activity_main.xml (메인 레이아웃) <?xml version="1.0" encoding="utf-8"?> 2-2. list_grid_item.xml (리스트 아이템 레이아웃) <?xml version="1.0" encoding="utf-8"?> # 리스트의..
notepad96.tistory.com
2. Main
2.1 activity_main.xml
<?xml version="1.0" encoding="utf-8"?>
<LinearLayout xmlns:android="http://schemas.android.com/apk/res/android"
    xmlns:app="http://schemas.android.com/apk/res-auto"
    xmlns:tools="http://schemas.android.com/tools"
    android:layout_width="match_parent"
    android:layout_height="match_parent"
    tools:context=".MainActivity">

    <androidx.recyclerview.widget.RecyclerView
        android:id="@+id/calendar_custom"
        android:layout_width="match_parent"
        android:layout_height="wrap_content"/>

</LinearLayout>
# 레이아웃은 각 월을 보여줄 리사이클러 뷰 하나로 구성된다.
2.2 MainActivity.kt
package com.example.calendarcustom

import androidx.appcompat.app.AppCompatActivity
import android.os.Bundle
import androidx.recyclerview.widget.LinearLayoutManager
import androidx.recyclerview.widget.PagerSnapHelper
import kotlinx.android.synthetic.main.activity_main.*

class MainActivity : AppCompatActivity() {
    override fun onCreate(savedInstanceState: Bundle?) {
        super.onCreate(savedInstanceState)
        setContentView(R.layout.activity_main)

        val monthListManager = LinearLayoutManager(this, LinearLayoutManager.HORIZONTAL, false)
        val monthListAdapter = AdapterMonth()

        calendar_custom.apply {
            layoutManager = monthListManager
            adapter = monthListAdapter
            scrollToPosition(Int.MAX_VALUE/2)
        }
        val snap = PagerSnapHelper()
        snap.attachToRecyclerView(calendar_custom)
    }
}
# calendar_custme 리사이클러뷰는 각 월을 나타낼 리스트로서 가로로 전환하기 위하여 LinearLayoutManager의 HORIZONTAL 속성을 준다.
# scrollToPosition은 리스트를 item의 위치를 지정한 곳에서 시작한다. 해당 위치에서 리스트를 시작하는 이유는 뒤 Adapter 부분에서 설명한다.
# PagerSnapHelper()를 설정함으로써 한 항목씩 스크롤이 되도록 만들 수 있다. 자세한 내용은 이전 글을 참고하면 될 것 같다.
Android Kotlin SnapHelper - 항목 단위로 스크롤
1. 결 과 # 해당 글은 리사이클러뷰에서 항목을 스크롤할 시 항목 단위로 전환이되고 싶을 경우 사용 가능한 방법을 기술한다. 위 결과를 보면 본래는 스크롤 시 적용 전의 결과를 갖지만 이 방법
notepad96.tistory.com
3. Month Adapter
3.1 list_item_month.xml
<?xml version="1.0" encoding="utf-8"?>
<LinearLayout xmlns:android="http://schemas.android.com/apk/res/android"
    android:layout_width="match_parent"
    android:layout_height="wrap_content"
    android:orientation="vertical">

    <TextView
        android:id="@+id/item_month_text"
        android:layout_width="match_parent"
        android:layout_height="wrap_content"
        android:padding="5dp"
        android:gravity="center"
        android:text="2022년 6월"
        android:textSize="22sp"
        android:textColor="@color/black"
        android:textStyle="bold" />

    <LinearLayout
        android:layout_width="match_parent"
        android:layout_height="wrap_content">
        <TextView
            android:layout_width="wrap_content"
            android:layout_height="wrap_content"
            android:layout_weight="1"
            android:text="일"
            android:textColor="#ff0000"
            android:gravity="center"
            android:textSize="18sp"/>
        <TextView
            android:layout_width="wrap_content"
            android:layout_height="wrap_content"
            android:layout_weight="1"
            android:text="월"
            android:textColor="@color/black"
            android:gravity="center"
            android:textSize="18sp"/>
        <TextView
            android:layout_width="wrap_content"
            android:layout_height="wrap_content"
            android:layout_weight="1"
            android:text="화"
            android:textColor="@color/black"
            android:gravity="center"
            android:textSize="18sp"/>
        <TextView
            android:layout_width="wrap_content"
            android:layout_height="wrap_content"
            android:layout_weight="1"
            android:text="수"
            android:textColor="@color/black"
            android:gravity="center"
            android:textSize="18sp"/>
        <TextView
            android:layout_width="wrap_content"
            android:layout_height="wrap_content"
            android:layout_weight="1"
            android:text="목"
            android:textColor="@color/black"
            android:gravity="center"
            android:textSize="18sp"/>
        <TextView
            android:layout_width="wrap_content"
            android:layout_height="wrap_content"
            android:layout_weight="1"
            android:text="금"
            android:textColor="@color/black"
            android:gravity="center"
            android:textSize="18sp"/>
        <TextView
            android:layout_width="wrap_content"
            android:layout_height="wrap_content"
            android:layout_weight="1"
            android:text="토"
            android:textColor="#0000ff"
            android:gravity="center"
            android:textSize="18sp"/>
    </LinearLayout>

    <View
        android:layout_width="match_parent"
        android:layout_height="1dp"
        android:layout_marginHorizontal="5dp"
        android:layout_marginVertical="3dp"
        android:background="#bbb"/>

    <androidx.recyclerview.widget.RecyclerView
        android:id="@+id/item_month_day_list"
        android:layout_width="match_parent"
        android:layout_height="wrap_content"/>

</LinearLayout>
# MainActivity에서 생성한 RecyclerView에서 보여줄 item의 레이아웃이다.
# 레이아웃은 최상단의 년과 월을 나타내는 TextView와 일요일~토요일을 표시하는 텍스트 그리고 일을 표시하기 위한 RecyclerView로 구성된다.
3.2 AdapterMonth.kt
package com.example.calendarcustom

import android.util.Log
import android.view.LayoutInflater
import android.view.View
import android.view.ViewGroup
import androidx.recyclerview.widget.GridLayoutManager
import androidx.recyclerview.widget.RecyclerView
import kotlinx.android.synthetic.main.list_item_month.view.*
import java.util.*

class AdapterMonth: RecyclerView.Adapter<AdapterMonth.MonthView>() {
    val center = Int.MAX_VALUE / 2
    private var calendar = Calendar.getInstance()

    inner class MonthView(val layout: View): RecyclerView.ViewHolder(layout)

    override fun onCreateViewHolder(parent: ViewGroup, viewType: Int): MonthView {
        val view = LayoutInflater.from(parent.context).inflate(R.layout.list_item_month, parent, false)
        return MonthView(view)
    }

    override fun onBindViewHolder(holder: MonthView, position: Int) {
        calendar.time = Date()
        calendar.set(Calendar.DAY_OF_MONTH, 1)
        calendar.add(Calendar.MONTH, position - center)
        holder.layout.item_month_text.text = "${calendar.get(Calendar.YEAR)}년 ${calendar.get(Calendar.MONTH) + 1}월"
        val tempMonth = calendar.get(Calendar.MONTH)

        var dayList: MutableList<Date> = MutableList(6 * 7) { Date() }
        for(i in 0..5) {
            for(k in 0..6) {
                calendar.add(Calendar.DAY_OF_MONTH, (1-calendar.get(Calendar.DAY_OF_WEEK)) + k)
                dayList[i * 7 + k] = calendar.time
            }
            calendar.add(Calendar.WEEK_OF_MONTH, 1)
        }

        val dayListManager = GridLayoutManager(holder.layout.context, 7)
        val dayListAdapter = AdapterDay(tempMonth, dayList)

        holder.layout.item_month_day_list.apply {
            layoutManager = dayListManager
            adapter = dayListAdapter
        }
    }

    override fun getItemCount(): Int {
        return Int.MAX_VALUE
    }
}
# 우선 fun getItemCount의 반환값을 보면 Int.MAX_VALUE로서 리스트의 항목 개수가 큰 수로 설정되어 있다.
이렇게 한 이유는 리스트를 좌우로 스크롤하였을 경우 이전 월과 이후 월들을 보여주기 위함으로써 위 MainActivity.kt서 scrollToPosition을 사용하여 Int.MAX_VALUE/2 서 항목이 시작되도록 설정하였다.
그러면 시작 위치인 Int.MAX_VALUE/2를 현재 월로 설정하여 이동할 수 있게 한다면 좌우로 실제로는 끝은 있지만, 거의 수억번 스크롤이 가능함으로 무한 스크롤이 가능한 것처럼 구현할 수 있다.
calendar.time = Date()
calendar.set(Calendar.DAY_OF_MONTH, 1)
calendar.add(Calendar.MONTH, position - center)
holder.layout.item_month_text.text = "${calendar.get(Calendar.YEAR)}년 ${calendar.get(Calendar.MONTH) + 1}월"
val tempMonth = calendar.get(Calendar.MONTH)
1행: Calendar의 time을 현재 날짜로 초기화 한다.
2행: set을 사용하여 현재 월의 1일로 이동한다.
3행: add를 사용하여 월 단위로 'position - center' 만큼 이동한다.
center = Int.MAX_VALUE/2이므로 리스트를 좌로 스크롤 할 경우 position - center는 -1이 되고 우로 스크롤 할 경우 +1이 된다.
이렇게 구한 값을 월단위로 이동함으로써 이전 월과 이후 월을 구할 수가 있다.
5행: 현재의 월을 저장한다.
var dayList: MutableList<Date> = MutableList(6 * 7) { Date() }
for(i in 0..5) {
    for(k in 0..6) {
        calendar.add(Calendar.DAY_OF_MONTH, (1-calendar.get(Calendar.DAY_OF_WEEK)) + k)
        dayList[i * 7 + k] = calendar.time
    }
    calendar.add(Calendar.WEEK_OF_MONTH, 1)
}

val dayListManager = GridLayoutManager(holder.layout.context, 7)
val dayListAdapter = AdapterDay(tempMonth, dayList)

holder.layout.item_month_day_list.apply {
    layoutManager = dayListManager
    adapter = dayListAdapter
}
위에서 보여주고자 하는 월을 구했다면 이제 그 월에서 보여줄 일들을 구하여 Grid 타입의 RecyclerView를 사용하여 각 날짜를 보여준다.
6주 * 7일의 날짜를 표시하며 각 정보는 dayList의 저장하여 AdapterDay의 파라미터로 준다.
4. Day Adapter
4.1 list_item_day.xml
<?xml version="1.0" encoding="utf-8"?>
<LinearLayout xmlns:android="http://schemas.android.com/apk/res/android"
    android:id="@+id/item_day_layout"
    android:layout_width="match_parent"
    android:gravity="right"
    android:layout_height="60dp"
    android:layout_marginTop="5dp"
    android:layout_marginRight="5dp">

    <TextView
        android:id="@+id/item_day_text"
        android:layout_width="wrap_content"
        android:layout_height="wrap_content"
        android:textSize="16sp"
        android:text="9"/>

</LinearLayout>
# 달력에서 각 일을 보여주는 Grid RecyclerView 항목의 레이아웃으로서 TextView 하나로 구성된다.
4.2 AdapterDay.kt
package com.example.calendarcustom

import android.graphics.Color
import android.view.LayoutInflater
import android.view.View
import android.view.ViewGroup
import android.widget.Toast
import androidx.recyclerview.widget.RecyclerView
import kotlinx.android.synthetic.main.list_item_day.view.*
import java.util.*

class AdapterDay(val tempMonth:Int, val dayList: MutableList<Date>): RecyclerView.Adapter<AdapterDay.DayView>() {
    val ROW = 6

    inner class DayView(val layout: View): RecyclerView.ViewHolder(layout)

    override fun onCreateViewHolder(parent: ViewGroup, viewType: Int): DayView {
        var view = LayoutInflater.from(parent.context).inflate(R.layout.list_item_day, parent, false)
        return DayView(view)
    }

    override fun onBindViewHolder(holder: DayView, position: Int) {
        holder.layout.item_day_layout.setOnClickListener {
            Toast.makeText(holder.layout.context, "${dayList[position]}", Toast.LENGTH_SHORT).show()
        }
        holder.layout.item_day_text.text = dayList[position].date.toString()

        holder.layout.item_day_text.setTextColor(when(position % 7) {
            0 -> Color.RED
            6 -> Color.BLUE
            else -> Color.BLACK
        })

        if(tempMonth != dayList[position].month) {
            holder.layout.item_day_text.alpha = 0.4f
        }
    }

    override fun getItemCount(): Int {
        return ROW * 7
    }
}
# 각 날짜를 표현하는 Grid 타입의 RecyclerView의 Adapter이다.
# fun getItemCount는 (ROW=6주) * 7일 로서 총 42개의 날짜가 표시된다.
# 파라미터로 받은 dayList를 이용하여 position % 7의 값이 0일 경우 일요일로서 빨강색을 6일 경우 토요일로서 파랑색의 스타일을 지정해 준다.
# 또한, 파라미터로 받은 tempMonth로 현재 월이 아닌 날짜의 경우 alpha를 낮추어 투명도를 줌으로써 현재 월의 날짜와 다르게 표시한다.
5. 전체 코드
GitHub - Notepad96/BlogExample
Contribute to Notepad96/BlogExample development by creating an account on GitHub.
github.com
'Android' 카테고리의 다른 글
| Android Kotlin Camera - 사진 찍고 불러오기 (0) | 2022.02.03 |
|---|---|
| Android Kotlin Font - 폰트 적용 (0) | 2022.02.02 |
| Android Kotlin Chip Button (0) | 2022.01.31 |
| Android Kotlin Calendar - 달력/시계 날짜 및 시간 지정하기 (0) | 2022.01.18 |
| Android Kotlin RecyclerView Parent View Style - 부모 뷰 오브젝트 스타일 변경 (0) | 2022.01.17 |
 Notepad


