 Notepad
[Android/Kotlin] Palette Color - 이미지의 맞는 Color 구하기
Notepad96
·2022. 9. 16. 20:40
1. 요약

이번 글에서는 Palette API를 사용하여 색상을 구하는 방법에 관하여 기술한다.
Palette를 사용하면 해당 이미지를 분석하여 색을 추출해낸다.
그리고 이 색들을 활용하면, 이미지에 따라 Material Design을 만족하는 배경색, 텍스트 색들을 구할 수 있다.
어떻게 활용할 수 있는지 예를 들자면 어두운 분위기의 이미지에서 색을 추출해 냈다면 어두운 배경을 얻게 되는데 이때 텍스트의 색도 어두우면 글자가 잘 보이지 않게 된다.
그래서 이러한 경우를 고려하여 글자를 잘 보이도록 텍스트 색으로는 대비되는 색을 자동으로 지정해준다.
이처럼 Palette를 사용하면 Material Design을 만족하도록 색 조합을 자동으로 구할 수 있다.
Palette를 사용하기 위해서는 아래처럼 라이브러리를 추가해주어야 한다.
...
dependencies {
    implementation 'androidx.palette:palette:1.0.0'
= 공식 문서 =
Palette API로 색상 선택 | Android 개발자 | Android Developers
팔레트 라이브러리는 이미지에서 중요한 색상을 추출하여 시각적으로 매력적인 앱을 만드는 데 도움이 되는 지원 라이브러리입니다.
developer.android.com
2. 레이아웃
2-1. activity_main.xml
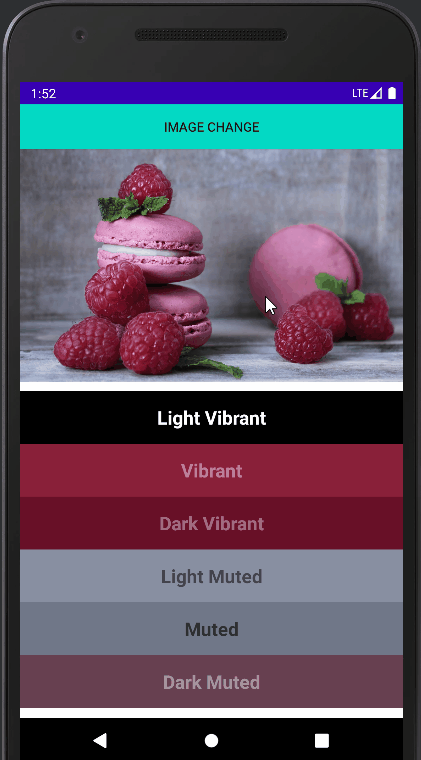
메인 레이아웃으로서 이미지를 나타낼 ImageView 1개, Image를 바꾸기 위해 사용할 Button 1개, Palette를 사용하여 추출한 6가지 주요 색상을 나타낼 TextView 6개로 구성하였다.
TextView에서는 Background Color와 Text Color를 추출한 색상에 따라서 적용하였으며 위 결과 이미지를 보면 알 수 있듯이 Background Color가 어두울 경우 반대로 Text Color는 밝은 색이 적용되어 텍스트가 잘 보이도록 나타난다.
<?xml version="1.0" encoding="utf-8"?>
<LinearLayout xmlns:android="http://schemas.android.com/apk/res/android"
    xmlns:app="http://schemas.android.com/apk/res-auto"
    xmlns:tools="http://schemas.android.com/tools"
    android:layout_width="match_parent"
    android:layout_height="match_parent"
    android:orientation="vertical"
    tools:context=".MainActivity">

    <androidx.appcompat.widget.AppCompatButton
        android:id="@+id/changeImg"
        android:layout_width="match_parent"
        android:layout_height="wrap_content"
        android:background="@color/teal_200"
        android:text="Image Change"/>

    <ImageView
        android:id="@+id/imageView01"
        android:layout_width="match_parent"
        android:layout_height="250dp"
        android:scaleType="fitXY"
        android:src="@drawable/sample"
        android:layout_marginBottom="10dp"/>

    <TextView
        android:id="@+id/textColor01"
        android:layout_width="match_parent"
        android:layout_height="wrap_content"
        android:padding="15dp"
        android:gravity="center"
        android:text="Light Vibrant"
        android:textSize="20sp"
        android:textStyle="bold"/>

    <TextView
        android:id="@+id/textColor02"
        android:layout_width="match_parent"
        android:layout_height="wrap_content"
        android:padding="15dp"
        android:gravity="center"
        android:text="Vibrant"
        android:textSize="20sp"
        android:textStyle="bold"/>

    <TextView
        android:id="@+id/textColor03"
        android:layout_width="match_parent"
        android:layout_height="wrap_content"
        android:padding="15dp"
        android:gravity="center"
        android:text="Dark Vibrant"
        android:textSize="20sp"
        android:textStyle="bold"/>

    <TextView
        android:id="@+id/textColor04"
        android:layout_width="match_parent"
        android:layout_height="wrap_content"
        android:padding="15dp"
        android:gravity="center"
        android:text="Light Muted"
        android:textSize="20sp"
        android:textStyle="bold"/>

    <TextView
        android:id="@+id/textColor05"
        android:layout_width="match_parent"
        android:layout_height="wrap_content"
        android:padding="15dp"
        android:gravity="center"
        android:text="Muted"
        android:textSize="20sp"
        android:textStyle="bold"/>

    <TextView
        android:id="@+id/textColor06"
        android:layout_width="match_parent"
        android:layout_height="wrap_content"
        android:padding="15dp"
        android:gravity="center"
        android:text="Dark Muted"
        android:textSize="20sp"
        android:textStyle="bold"/>

</LinearLayout>
3. 코드 및 설명
3-1. MainActivity.kt
우선 Palette를 구하기 위해서 선언한 함수를 보면 createPaletteSync, createPaletteAsync 2개로 각각 동기와 비동기 적으로 동작한다.
인수로는 둘 다 Bitmap을 받으며 둘 중 무엇을 사용할지는 사용하는 상황에 따라서 결정하면 된다.
우선 전체적인 프로세스를 설명하자면 해당 예시에서는 3개의 Image들을 갖고서 Button을 클릭할 때마다 전환되어 색을 구하도록 구현하였다.
Button을 클릭할 때마다 setImage함수를 실행하며, setImage 함수는 색을 구하고 적용하는 함수로서 우선 createPaletteSync 함수를 호출하여 Image에서 색을 추출한 Palette를 초기화한다.
다음으로 해당 Image에서 얻은 Palette를 갖고 setColor 함수를 호출하며, setColor함수는 인자로 TextView와 Palette.Swatch를 받아 해당 TextView에 추출해낸 색상의 Background Color와 Text Color를 적용하도록 한다.
package com.notepad96.paletteapi

import android.graphics.Bitmap
import android.graphics.BitmapFactory
import android.os.Bundle
import android.widget.TextView
import androidx.appcompat.app.AppCompatActivity
import androidx.core.content.ContextCompat
import androidx.palette.graphics.Palette
import com.notepad96.paletteapi.databinding.ActivityMainBinding

class MainActivity : AppCompatActivity() {
    private val binding: ActivityMainBinding by lazy { ActivityMainBinding.inflate(layoutInflater) }
    private val images = listOf(R.drawable.sample, R.drawable.bread, R.drawable.cat)
    var count = 0

    override fun onCreate(savedInstanceState: Bundle?) {
        super.onCreate(savedInstanceState)
        setContentView(binding.root)
        setImage(count)

        binding.changeImg.setOnClickListener {
            setImage(++count % 3)
        }
    }
    private fun setImage(count: Int) {
        binding.imageView01.setImageResource(images[count])

        val palette = createPaletteSync(BitmapFactory.decodeResource(resources, images[count]))

        setColor(binding.textColor01, palette.lightVibrantSwatch)
        setColor(binding.textColor02, palette.vibrantSwatch)
        setColor(binding.textColor03, palette.darkVibrantSwatch)
        setColor(binding.textColor04, palette.lightMutedSwatch)
        setColor(binding.textColor05, palette.mutedSwatch)
        setColor(binding.textColor06, palette.darkMutedSwatch)
    }

    private fun setColor(view: TextView, swatch: Palette.Swatch?) {
        with(view) {
            setBackgroundColor(swatch?.rgb ?: ContextCompat.getColor(context, R.color.default_background))
            setTextColor(swatch?.titleTextColor ?: ContextCompat.getColor(context, R.color.default_textColor))
        }
    }

    // 동기
    private fun createPaletteSync(bitmap: Bitmap): Palette = Palette.from(bitmap).generate()

    // 비동기
    fun createPaletteAsync(bitmap: Bitmap) {
        Palette.from(bitmap).generate { palette ->

        }
    }
}
setImage 부분을 다시 보면 Palette로부터 추출해낸 6가지 Swatch가 보인다.
Swatch는 견본이라는 뜻으로 여기서는 대충 테마색 조합 같은 걸로 이해하면 될 것 같다.
6가지 Swatch로는 다음과 같이 있으며 이 중에서 전체적으로 원하는 분위기에 따라서 색상 조합을 선택하면 된다.
- Light Vibrant (밝고 생생함)
- Vibrant (생생함)
- Dark Vibrant (어둡고 생생함)
- Light Muted (밝고 수수함)
- Muted (수수함)
- Dark Muted (어둡고 수수함)
단, 주의할 점으로는 Swatch로 Null 값이 반환될 수 있으므로 Null일 경우 처리를 반드시 해주어야 한다.
아래는 setColor 함수로서 Color를 주는 부분을 보면
private fun setColor(view: TextView, swatch: Palette.Swatch?) {
    with(view) {
        setBackgroundColor(swatch?.rgb ?: ContextCompat.getColor(context, R.color.default_background))
        setTextColor(swatch?.titleTextColor ?: ContextCompat.getColor(context, R.color.default_textColor))
    }
}
?: (엘비스 연산자)를 사용하여 swatch.rgb가 Null일 경우 default_background Color가 적용되도록 한다.
해당 예시에서는 default_background = Black, default_textColor = White으로 정의해두었다.
위 결과를 보면 Swatch가 null이어서 Default Color 값이 적용되어 Background Color가 Black이며 Text Color가 White인 부분들이 있는 것을 확인할 수 있다.
4. 전체 파일
GitHub - Notepad96/BlogExample02
Contribute to Notepad96/BlogExample02 development by creating an account on GitHub.
github.com
'Android' 카테고리의 다른 글
| [Android/Kotlin] AlarmManager + Notification - 지정한 시간에 알림 생성 (0) | 2022.09.15 |
|---|---|
| [Android/Kotlin] RecyclerView + SwipeRefreshView - 리스트 새로고침 (0) | 2022.09.12 |
| [Android/Kotlin] SwipeRefreshLayout - 내려서 새로고침 (0) | 2022.09.11 |
| [Android/Kotlin] 알림(Notification) 만들기 (1) | 2022.09.10 |
| [Android/Kotlin] AlarmManager - 알람 등록 (2) | 2022.09.09 |