[Android/Kotlin] RecyclerView + SwipeRefreshView - 리스트 새로고침
Notepad96
·2022. 9. 12. 20:28
1. 요약

이번 글에서는 RecylcerView와 SwipeRefreshLayout을 같이 사용하여 새로고침이 가능한 List를 만드는 방법에 관하여 기술한다.
SwipeRefreshLayout을 사용하기 위해서는 아래 종속성을 build.gradle(. app)의 추가해주어야 하며
dependencies {
    implementation("androidx.swiperefreshlayout:swiperefreshlayout:1.1.0")
}
SwipeRefreshLayout에 관한 기본적인 사용방법에 관해서는 이전의 작성한 글이 있기 때문에 해당 글을 참조하면 될 것 같다.
[Android/Kotlin] SwipeRefreshLayout - 내려서 새로고침
1. 요약 이번 글에서는 Layout을 아래로 Swipe 하여 새로고침이 가능한 SwipeRefreshLayout에 관하여 기술한다. SwipeRefeshLayout을 사용하기 위해서는 아래 종속성을 build.gradle(. app) dependencies의 추가..
notepad96.tistory.com
2. 레이아웃
2-1. activity_main.xml
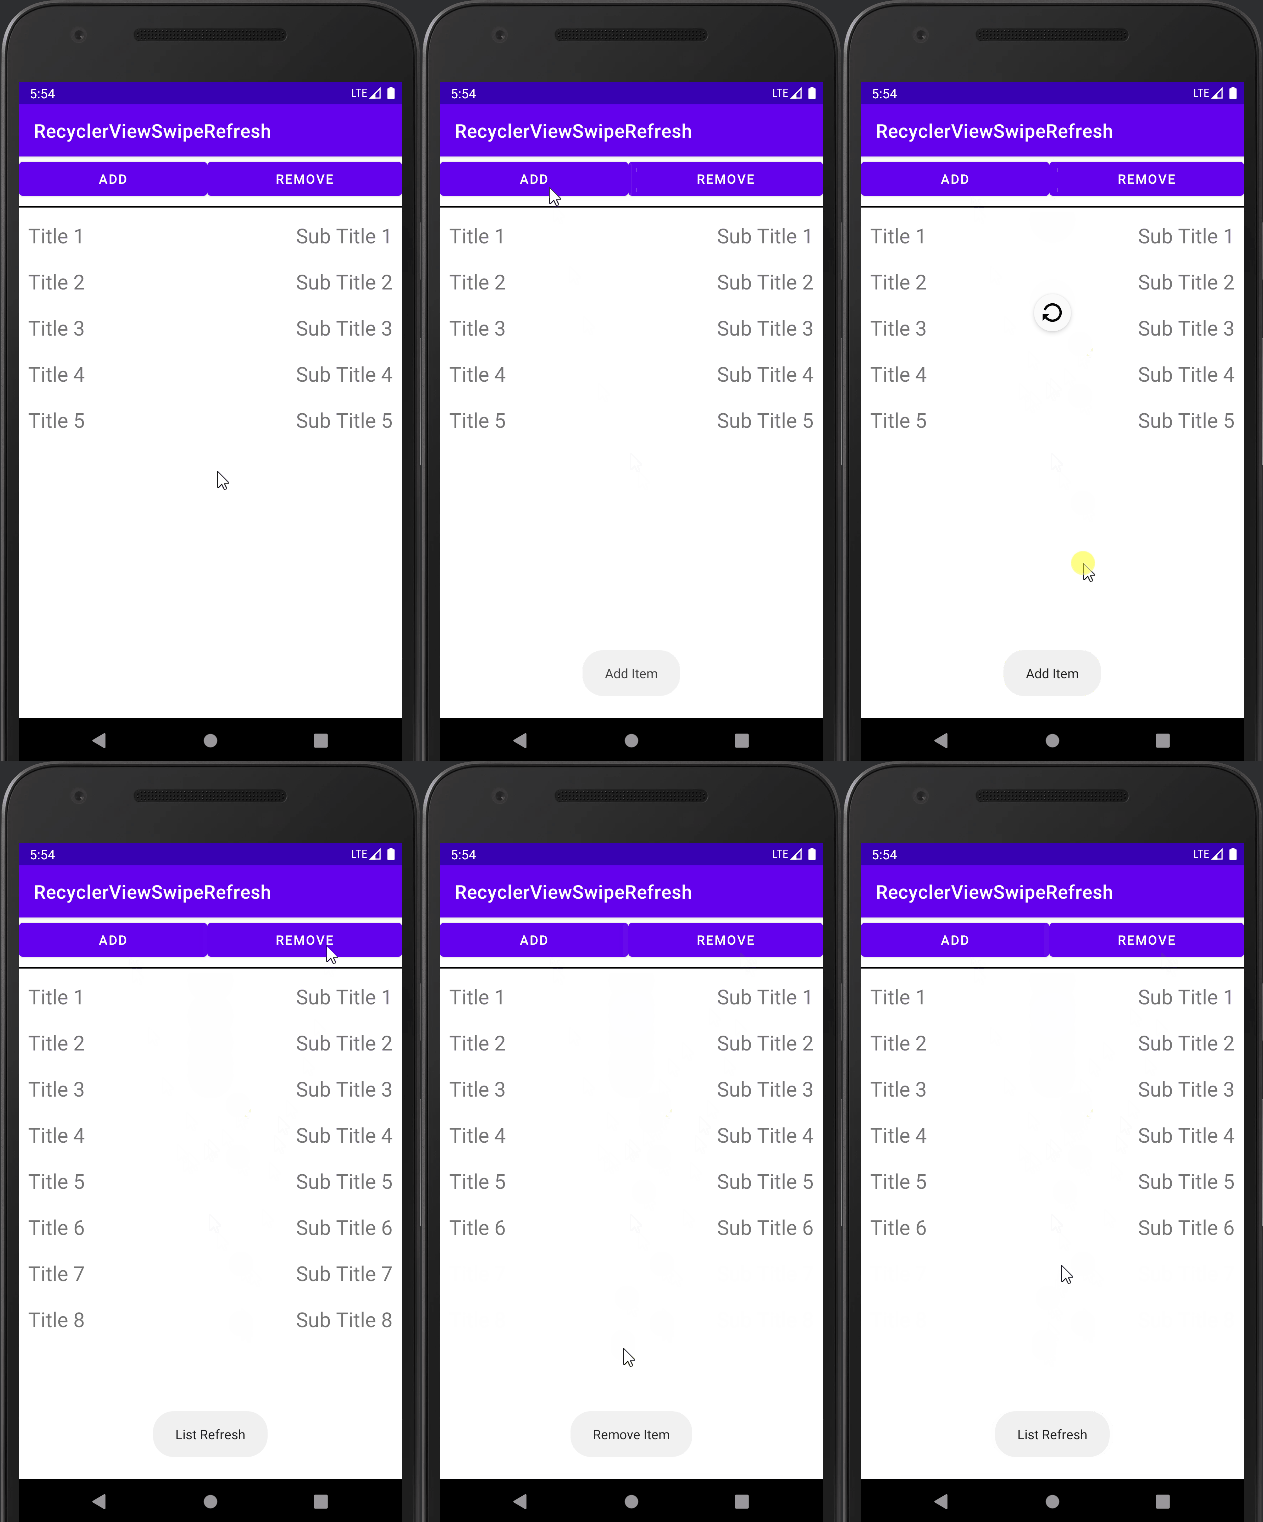
메인 레이아웃으로서 Button 2개와 RecyclerView 1개로 구성하였다.
Button 2개는 각각 List의 Item을 추가하거나 제거하는 동작을 위해 사용하였다.
RecyclerView 같은 경우 새로고침이 가능하도록 SwipeRefreshLayout 속의 정의하였으며 새로고침 했을 경우 List의 Item 개수가 업데이트되도록 할 것이다.

<?xml version="1.0" encoding="utf-8"?>
<LinearLayout xmlns:android="http://schemas.android.com/apk/res/android"
    xmlns:app="http://schemas.android.com/apk/res-auto"
    xmlns:tools="http://schemas.android.com/tools"
    android:layout_width="match_parent"
    android:layout_height="match_parent"
    android:orientation="vertical"
    tools:context=".MainActivity">

    <LinearLayout
        android:layout_width="match_parent"
        android:layout_height="wrap_content"
        android:orientation="horizontal">
        <Button
            android:id="@+id/btnAdd"
            android:layout_width="wrap_content"
            android:layout_height="wrap_content"
            android:layout_weight="1"
            android:text="Add" />
        <Button
            android:id="@+id/btnRemove"
            android:layout_width="wrap_content"
            android:layout_height="wrap_content"
            android:layout_weight="1"
            android:text="Remove" />
    </LinearLayout>

    <View
        android:layout_width="match_parent"
        android:layout_height="2dp"
        android:layout_marginVertical="5dp"
        android:background="@color/black" />

    <androidx.swiperefreshlayout.widget.SwipeRefreshLayout
        android:id="@+id/refreshLayout01"
        android:layout_width="match_parent"
        android:layout_height="match_parent">
        <androidx.recyclerview.widget.RecyclerView
            android:id="@+id/recyclerview01"
            android:layout_width="match_parent"
            android:layout_height="match_parent"/>
    </androidx.swiperefreshlayout.widget.SwipeRefreshLayout>

</LinearLayout>
2-2. item_list.xml
List의 나타낼 각 항목들의 레이아웃으로서 간단하게 TextView 2개로 나타내었다.

<?xml version="1.0" encoding="utf-8"?>
<LinearLayout xmlns:android="http://schemas.android.com/apk/res/android"
    android:layout_width="match_parent"
    android:layout_height="wrap_content"
    android:orientation="horizontal"
    android:padding="10dp">

    <TextView
        android:id="@+id/textTitle"
        android:layout_width="wrap_content"
        android:layout_height="wrap_content"
        android:text="Title 1"
        android:textSize="22sp" />

    <TextView
        android:id="@+id/textSubTitle"
        android:layout_width="match_parent"
        android:layout_height="wrap_content"
        android:gravity="right"
        android:text="Sub Title 1"
        android:textSize="22sp" />

</LinearLayout>
3. 코드 및 설명
3-1. MainActivity.kt
SwipeRefreshLayout을 사용하기 때문에 간단하게 새로고침 될 경우 원하는 동작만을 구현해주면 된다.
여기서 원하는 동작은 RecyclerView 항목을 업데이트하는 것으로 해당 작업은 RecyclerView의 Adapter인 listAdapter 인스턴스서 notifyDataSetChanged를 호출함으로써 List의 Data가 변화되었음을 알려 List를 다시 그리도록 만들면 된다.
btnAdd, btnRemove 2개의 각 Button을 클릭할 경우 Adapter서 선언한 함수를 호출하여 List의 항목 수를 변화시키도록 만든다.
+) 이 예시는 SwipeRefreshLayout을 활용하기 위해서 다음과 같이 구현했을 뿐이며, Button을 클릭하여 List의 항목이 변경될 때마다 listAdapter의 notifyItemInserted나 notifyItemRemoved를 호출하도록 하여 더욱 효율적으로 List를 업데이트할 수 있다.
package com.notepad96.recyclerviewswiperefresh

import androidx.appcompat.app.AppCompatActivity
import android.os.Bundle
import android.widget.Toast
import androidx.recyclerview.widget.LinearLayoutManager
import com.notepad96.recyclerviewswiperefresh.databinding.ActivityMainBinding

class MainActivity : AppCompatActivity() {
    private val binding: ActivityMainBinding by lazy { ActivityMainBinding.inflate(layoutInflater) }

    override fun onCreate(savedInstanceState: Bundle?) {
        super.onCreate(savedInstanceState)
        setContentView(binding.root)

        val listAdapter = ListAdapter()

        binding.recyclerview01.apply {
            adapter = listAdapter
            layoutManager = LinearLayoutManager(context)
            setHasFixedSize(true)
        }

        binding.refreshLayout01.setOnRefreshListener {
            listAdapter.notifyDataSetChanged()
            Toast.makeText(applicationContext, "List Refresh", Toast.LENGTH_SHORT).show()
            binding.refreshLayout01.isRefreshing = false
        }

        binding.btnAdd.setOnClickListener {
            Toast.makeText(applicationContext, "Add Item", Toast.LENGTH_SHORT).show()
            listAdapter.addItem()
        }
        binding.btnRemove.setOnClickListener {
            Toast.makeText(applicationContext, "Remove Item", Toast.LENGTH_SHORT).show()
            listAdapter.removeItem()
        }
    }
}
3-2. ListAdapter.kt
RecyclerView서 사용할 Adapter 정의 파일이다.
레이아웃은 TextView 2개로 나타낼 값은 Position 값을 사용하여 간단하게 구성하였다.
나타낼 Item(항목) 수는 기본적으로 5개를 갖으며 addItem, removeItem 함수를 정의하여 각 함수를 호출하였을 때 count 값을 증감시켜 항목의 개수를 조절할 수 있도록 구현하였다.
package com.notepad96.recyclerviewswiperefresh

import android.view.LayoutInflater
import android.view.ViewGroup
import androidx.recyclerview.widget.RecyclerView
import com.notepad96.recyclerviewswiperefresh.databinding.ItemListBinding

class ListAdapter: RecyclerView.Adapter<ListAdapter.MyView>() {
    var count = 5

    inner class MyView(private val binding: ItemListBinding): RecyclerView.ViewHolder(binding.root) {
        fun bind(pos: Int) {
            binding.textTitle.text = "Title ${pos+1}"
            binding.textSubTitle.text = "Sub Title ${pos+1}"
        }
    }

    override fun onCreateViewHolder(parent: ViewGroup, viewType: Int): MyView {
        val view = ItemListBinding.inflate(LayoutInflater.from(parent.context), parent, false)
        return MyView(view)
    }

    override fun onBindViewHolder(holder: MyView, position: Int) {
        holder.bind(position)
    }

    override fun getItemCount(): Int {
        return count
    }

    fun addItem() {
        this.count++
    }

    fun removeItem() {
        if(this.count > 0) this.count--
    }
}
4. 전체 파일
GitHub - Notepad96/BlogExample02
Contribute to Notepad96/BlogExample02 development by creating an account on GitHub.
github.com
'Android' 카테고리의 다른 글
| [Android/Kotlin] Palette Color - 이미지의 맞는 Color 구하기 (0) | 2022.09.16 |
|---|---|
| [Android/Kotlin] AlarmManager + Notification - 지정한 시간에 알림 생성 (0) | 2022.09.15 |
| [Android/Kotlin] SwipeRefreshLayout - 내려서 새로고침 (0) | 2022.09.11 |
| [Android/Kotlin] 알림(Notification) 만들기 (1) | 2022.09.10 |
| [Android/Kotlin] AlarmManager - 알람 등록 (2) | 2022.09.09 |
 Notepad


