Android Kotlin DB - insert, delete, update, search(삽입, 삭제, 업데이트, 탐색) (5)
Notepad96
·2020. 12. 7. 23:45

1. Layout (activity_main.xml)
<?xml version="1.0" encoding="utf-8"?>
<LinearLayout xmlns:android="http://schemas.android.com/apk/res/android"
    xmlns:app="http://schemas.android.com/apk/res-auto"
    xmlns:tools="http://schemas.android.com/tools"
    android:layout_width="match_parent"
    android:layout_height="match_parent"
    android:orientation="vertical"
    tools:context=".MainActivity">

    <LinearLayout
        android:layout_width="match_parent"
        android:layout_height="wrap_content"
        android:orientation="vertical">

        <EditText
            android:id="@+id/insertName"
            android:layout_width="match_parent"
            android:layout_height="wrap_content"
            android:layout_weight="1"
            android:ems="10"
            android:hint="Name"
            android:inputType="textPersonName" />

        <EditText
            android:id="@+id/insertWriter"
            android:layout_width="match_parent"
            android:layout_height="wrap_content"
            android:layout_weight="1"
            android:ems="10"
            android:hint="Writer"
            android:inputType="textPersonName" />

        <EditText
            android:id="@+id/insertPrice"
            android:layout_width="match_parent"
            android:layout_height="wrap_content"
            android:layout_weight="1"
            android:ems="10"
            android:hint="Price"
            android:imeOptions="actionNone"
            android:inputType="number" />

        <Button
            android:id="@+id/button"
            android:layout_width="match_parent"
            android:layout_height="wrap_content"
            android:layout_weight="1"
            android:onClick="insert"
            android:text="추 가" />
    </LinearLayout>

    <LinearLayout
        android:layout_width="match_parent"
        android:layout_height="wrap_content"
        android:layout_marginBottom="20dp"
        android:orientation="horizontal">

        <EditText
            android:id="@+id/deleteID"
            android:layout_width="wrap_content"
            android:layout_height="wrap_content"
            android:layout_weight="1"
            android:ems="10"
            android:hint="삭제 ID"
            android:inputType="number" />

        <Button
            android:id="@+id/button2"
            android:layout_width="wrap_content"
            android:layout_height="wrap_content"
            android:layout_weight="1"
            android:onClick="delete"
            android:text="삭 제" />
    </LinearLayout>

    <LinearLayout
        android:layout_width="match_parent"
        android:layout_height="wrap_content"
        android:orientation="horizontal">

        <EditText
            android:id="@+id/updateID"
            android:layout_width="wrap_content"
            android:layout_height="wrap_content"
            android:layout_weight="1"
            android:ems="10"
            android:hint="업데이트 ID"
            android:inputType="number" />

        <EditText
            android:id="@+id/updateValue"
            android:layout_width="wrap_content"
            android:layout_height="wrap_content"
            android:layout_weight="1"
            android:ems="10"
            android:hint="Value"
            android:inputType="textPersonName" />
    </LinearLayout>

    <LinearLayout
        android:layout_width="match_parent"
        android:layout_height="wrap_content"
        android:orientation="horizontal">

        <Button
            android:id="@+id/unBtn"
            android:layout_width="wrap_content"
            android:layout_height="wrap_content"
            android:layout_weight="1"
            android:onClick="update"
            android:text="Name 변경" />

        <Button
            android:id="@+id/uwBtn"
            android:layout_width="wrap_content"
            android:layout_height="wrap_content"
            android:layout_weight="1"
            android:onClick="update"
            android:text="Writer 변경" />

        <Button
            android:id="@+id/upBtn"
            android:layout_width="wrap_content"
            android:layout_height="wrap_content"
            android:layout_weight="1"
            android:onClick="update"
            android:text="Price 변경" />
    </LinearLayout>

    <TextView
        android:id="@+id/textView"
        android:layout_width="match_parent"
        android:layout_height="match_parent"
        android:layout_weight="1"
        android:gravity="center"
        android:text="Hello World!"
        android:textSize="14sp"
        android:textStyle="bold" />

    <Button
        android:id="@+id/button3"
        android:layout_width="match_parent"
        android:layout_height="wrap_content"
        android:onClick="listUpdate"
        android:text="View Update" />

</LinearLayout>

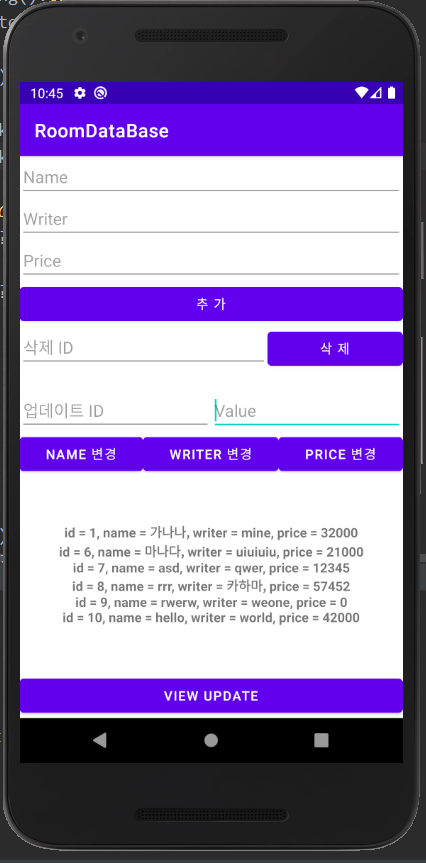
- Name, Writer, Price를 입력 후 '추 가' 버튼을 클릭하면 DB에 추가된다.
- 삭제할 ID를 입력 후 '삭 제' 버튼을 클릭하면 DB에 해당 ID를 갖는 행을 제거한다.
- 업데이트 ID와 변경할 Value 를 입력한 후 'Name, Writer, Price 변경' 버튼을 각각 클릭하면 DB에서 해당 ID의 Name, Writer, Price 값을 업데이트 할 수 있다.
- 'View Update' 버튼을 클릭하면 현재 DB의 저장된 모든 값들을 보여준다.
2. MainActivity.kt
class MainActivity : AppCompatActivity() {
    var db: AppDataBase? = null

    override fun onCreate(savedInstanceState: Bundle?) {
        super.onCreate(savedInstanceState)
        setContentView(R.layout.activity_main)

        db = AppDataBase.getInstance(this)
    }

    override fun onDestroy() {
        db = null
        AppDataBase.deleteInstance()
        super.onDestroy()
    }

    fun insert(view: View) {
        val name = if(insertName.text.isBlank()) "Empty" else insertName.text.toString()
        val writer = if(insertWriter.text.isBlank()) "Empty" else insertWriter.text.toString()
        val price = if(insertPrice.text.isBlank()) 0 else insertPrice.text.toString().toInt()

        CoroutineScope(Dispatchers.IO).launch {
            db?.bookDao()?.insertBook(
                Book(name, writer, price)
            )
        }
        Toast.makeText(this, "삽입 성공!", Toast.LENGTH_SHORT).show()
        insertName.setText("")
        insertWriter.setText("")
        insertPrice.setText("")
    }

    fun delete(view: View) {
        val id = if(deleteID.text.isBlank()) 0L else deleteID.text.toString().toLong()

        CoroutineScope(Dispatchers.IO).launch {
            val check = db?.bookDao()?.isBook( id )

            CoroutineScope(Dispatchers.Main).launch {
                if( check == 1)
                    Toast.makeText(applicationContext, "삭제 성공!", Toast.LENGTH_SHORT).show()
                else
                    Toast.makeText(applicationContext, "해당 ID 없음!", Toast.LENGTH_SHORT).show()
            }
            db?.bookDao()?.deleteBook( id )
        }
        deleteID.setText("")
    }

    fun update(view: View) {
        val id = updateID.text.toString().toLong()
        val value = updateValue.text.toString()

        CoroutineScope(Dispatchers.IO).launch {
            when(view.id) {
                R.id.unBtn -> db?.bookDao()?.updateName(id, value)
                R.id.uwBtn -> db?.bookDao()?.updateWriter(id, value)
                R.id.upBtn -> {
                    if(value.isDigitsOnly())
                        db?.bookDao()?.updatePrice(id, value.toInt())
                    else
                        db?.bookDao()?.updatePrice(id, 0)
                }
            }
        }
        updateID.setText("")
        updateValue.setText("")
    }

    fun listUpdate(view: View) {
        CoroutineScope(Dispatchers.IO).launch {
            var count = db?.bookDao()?.getCount()
            var list = db?.bookDao()?.getAll()

            CoroutineScope(Dispatchers.Main).launch {
                if(count == 0 ) {
                    textView.text = "데이터가 없습니다."
                } else {
                    list?.forEach { Log.d("Testing", it.toString()) }
                    textView.text = list?.joinToString("\n")
                }
            }
        }
    }

}
- AppDataBase의 getInstance를 사용하여서 db를 초기화 한다.
- insert, delete, update 함수들은 각각 삽입, 삭제, 업데이트 기능을 구현 한 것이다. 눈에 띄는 점은
CoroutineScope(Dispatchers.IO).launch {
	db?.bookDao()?.insertBook(
		Book(name, writer, price)
	)
}
다음과 같이 Database의 접근하기 위해서 CoroutineScope를 감싸준 것이다. 이렇게 감싸주지 않는다면
Caused bt: java.lang.IllegalStateException: Cannot access database on the main thread since it may potentially lock the UI for a long period of time.
이와 같은 에러가 발생하며 이는 main thread에서는 DB에 접근할 수 없다는 것이다.
이같은 문제는 CoroutineScope를 사용하여 Dispatchers.IO Thread로 접근하여 해결할 수 있다.
결국 문제는 Database의 접근하기 위해서는 Main Thread에서는 불가한 것이므로 꼭, CoroutineScope를 사용하지 않아여도 다른 방법으로도 해결 가능하다.
- listUpdate 함수는 현재 DB에 저장된 값들을 가져와 View에 보여줄 수 있도록 처리한다.
fun listUpdate(view: View) {
        CoroutineScope(Dispatchers.IO).launch {
            var count = db?.bookDao()?.getCount()
            var list = db?.bookDao()?.getAll()

            CoroutineScope(Dispatchers.Main).launch {
                if(count == 0 ) {
                    textView.text = "데이터가 없습니다."
                } else {
                    list?.forEach { Log.d("Testing", it.toString()) }
                    textView.text = list?.joinToString("\n")
                }
            }
        }
    }
위와 같은 이유에서 DB에 접근하기 위하여 CoroutineScope으로 감싸주었는데 그 안에 또 CoroutineScope를 사용하였다.
이는 왜냐하면 DB에 접근하기 위해서 Dispatchers.IO Thread로 접근하고 있는 상태에서 Main Thread에서 현재 UI를 보여주고 있는 textView를 수정하기 위해서는 Main Thread에서 접근하여야 하기 때문이다.
따라서 현재 UI를 수정하기 위해서 CoroutineScope(Dispatchers.Main) 를 사용하여 Main Thread으로 접근하여 textView를 수정하였다.
3. 과정 정리 및 전체 코드
Android Kotlin DB - Room을 사용하여 데이터베이스 사용 (1)
1. Room Room은 SQLite에 대하여 추상화 레이어를 제공하여 원활한 데이터베이스 액세스를 지원하는 동시에 SQLite를 완벽하게 활용할 수 있게한다. 따라서 공식 문서에서도 SQLite 대신 Room을 사용할 것
notepad96.tistory.com
'Android' 카테고리의 다른 글
| Android Kotlin id로 View 접근 (0) | 2021.10.07 |
|---|---|
| Android Kotlin - AlertDialog(알림창) 기본 및 커스텀 (0) | 2021.08.22 |
| Android Kotlin DB - AppDataBase 데이터베이스 생성 (4) (0) | 2020.12.07 |
| Android Kotlin DB - DAO를 사용하여 데이터 접근 (3) (0) | 2020.12.07 |
| Android Kotlin DB - Table 정의 (2) (0) | 2020.12.06 |
 Notepad


